No budget? Don’t worry. Make it yourself.
Brief explanation of electrical conductivity (EC)
The two most important factors in nutrient and water management are conductivity (EC) and pH. Even though it is essential to understand both concepts, in this article we are going to talk basically about the electrical conductivity of water.
The conductivity of a solution of water is the capacity of that water to conduct an electric current. Distilled or de-ionised water will not electricity at all. As salts are dissolved in the water, the conductivity of this water increases. The conductivity of a nutrient solution is just the measurement of its “strength” as indicated by the quantity of salts dissolved. In other words: absolutely pure water doesn’t conduct electricity. “Dirty” water does conduct it.
Plants have in the root system a membrane that filters the water. It is like a magnet. It attracts the metallic salts contained in fertilizers and minerals contained in the water. The roots contain a high level of metallic salts. Because of this, they attract the water from outside when we are watering our plants. But if the water we use to water our plants is very “hard” and contains more metallic salts than the ones contained in the roots, the effect is the opposite. The outside water (what we use to water) attracts the water from the roots and, therefore, our plants become dehydrated. I have seen it quite a few times. You keep watering but your plants begin to look dry and finally they die of dehydration. Remember, it is a question of magnetism.
When you grow your cannabis plants (or any other kind of plants) the ideal is to have very clean water. Why? Because each plant tolerates certain amount of electrical conductivity (EC). If we surpass it, the plant will die. In other words: every plant can accept certain amount of dissolved “dirtiness”.
Now think that your fertilizers have dissolved metallic salts. Imagine your cannabis can tolerate up to 2.3 milisiemens (it is a type of EC measure). In fact every strain tolerates different amounts of EC. But if the water you have at hand to water has, for example, 1.5 milisiemens of EC, you can add to your water only 0.8 milisiemens of EC. If you add more, you will exceed the 2.3 milisiemens your plant can tolerate.
The problem is that the milisiemens of dissolved salts your water has aren’t necessarily good for your plants. Therefore, the cleaner your water is, the more “good” fertilizer you can add and the better results you will get. Therefore, the cleaner your water is, the more you can fertilize. Clean water is one of the most important factors to get good marijuana.
Unfortunately, it is very common to have “hard” water. This occurs especially in places like California, Spain, Italy, Greece and many others, where the land has a lot of clay and cast. This happened to me and I had to build my own water filter with no money for it.
How did I do it?


I used a technique that I learned in the Army. Who was going to tell me that 1.5 years spent there were going to be good for something? I apologize to those who consider being in the Army is great. In my country spending that time in the army wasn’t an option. You simply had to do and nobody paid you any money for it.
In the Army I learned that when you found a river whose water was not clean, you could dig a hole, 3 or 5 feet away from the shore and wait for the water to fill it. Because the water from the river, according to the principle of communicating vessels, reaches the hole and fills it with clean water. Why is this water clean? Because the sand is a natural filter and the water will become clean after crossing the space between the river and the hole you dug some feet away. The further you dig the hole, the cleaner the water will become. It can be the difference between drinkable and not drinkable water.
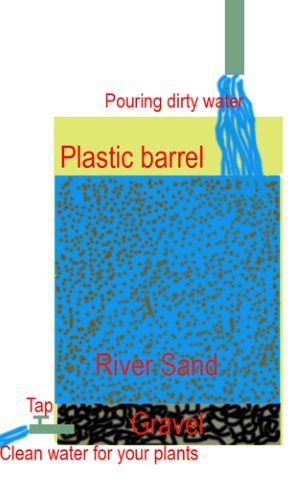
I got a barrel in a dumping are. The barrel had capacity for about 100 liters of water. I made a hole in the bottom side of the barrel and I put a tap. I filled the first twenty centimeters of the barrel with gravel. This gravel was about 5 centimeters in diameter. It doesn’t need to be exact.
These pieces of gravel were meant to hold the tap and, above all, to avoid the upper river sand located just on top (which is much thinner and could obstruct the exit of the tap.
Right on top of this gravel I put a piece of metallic cloth which avoids the thin river sand to mix with the bigger gravel. This cloth has very small holes but big enough to let the water to pass.
On top of the metallic cloth I put river sand .The quantity must fill about two thirds of the barrel. This sand is the one that will filter the dirty water.
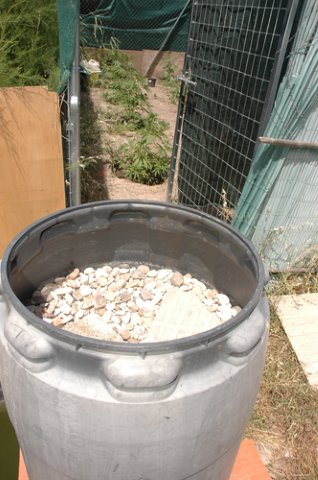
Usually, on top of this river sand I put some gravels. Why? Because when the water hits the river sand it can move it. Placing a heavier type of rock you avoid this undesired movement. It is just a way to fix everything.
I personally leave a hose on top of the sand and put a stone on top to fix it. It is just a way to avoid the hose moving.
As we said, on the lower side of the barrel I put a tap that I open or close when water is needed.
Although the filter works from the first day, we should expect its best results after one week working. This happens because one week is the time the sand needs to develop some microorganisms that help to clean the water.
I don’t know if I explained myself well. But, anyway, the pictures are clear enough to make clear the way this homemade filter works.
My water has a EC of 1.2 milisiemens. After passing through the filter the EC went down to 0.5 milisiemens. It definitely works!


